Table Of Content

Again, keep in mind that afro textured hair is curly—it will often appear longer when those coils are straightened out. The objective should be to fill in the gaps between the hairs according to the guidelines, as this will result in a head of hair that seems more realistic. Therefore, as you can see in the illustration that I’ve shown below. When you draw similar curves, you end up with an extremely unrealistic drawing. On the other hand, sketching curves with a greater variety in the sizes of the curves leads to a realistic hair curl.
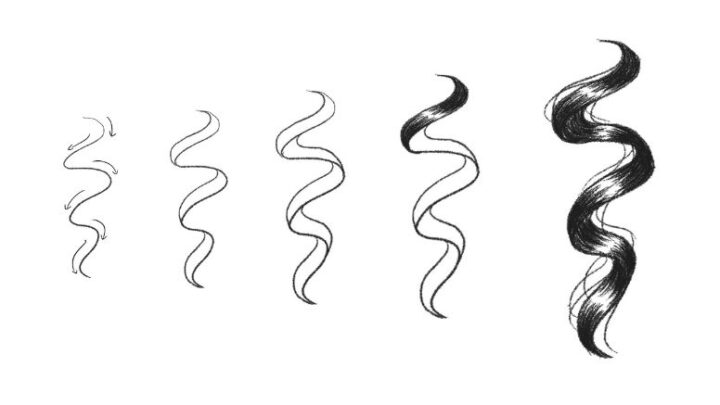
Step Three: Draw locks of hair
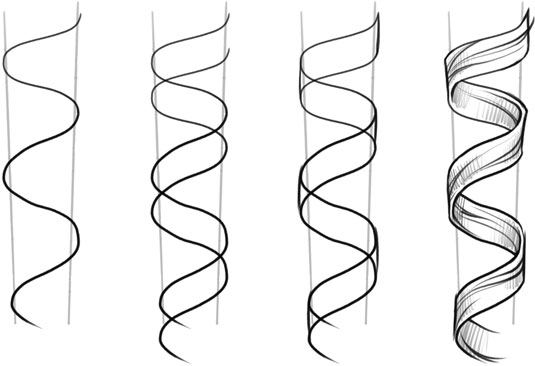
If you want to add some variation to the hair texture, then try mixing up your pens with broader and finer types. Draw the curls in layers, add shading to the hair drawing and pay attention to the direction and flow of the curls. Gradually build up the depth and volume of the curls by layering darker shades of graphite.
Techniques and Tips
When you are drawing, it might also assist you in avoiding making mistakes. After reading this you are sure to know how to draw curly hair and the different types of curly hair. Whether you want to know how to draw curly hair that has loose curls or curly hair that has lots of coils to them, it’s quite easy.
How to draw a realistic eye
A beauty with hair that jokes with the wind: Leonardo da Vinci's Scapigliata - Finestre sull'Arte
A beauty with hair that jokes with the wind: Leonardo da Vinci's Scapigliata.
Posted: Fri, 20 Jan 2023 09:25:15 GMT [source]
That being said, if there are aspects you’re really struggling with, you should feel free to remove or simplify them. Same as the previous example begin by making an outline drawing of the head. All of the examples in this tutorial will use fairly generic lighting with no particularly strong one directional light source. If you are going to be follows this tutorial it’s best to do so using pencil and paper.
How to Draw A Star – A Step by Step Guide
The lines in the examples have been made slightly darker just so that they are easier to see. Work on one part of the hair at a time, while following the general direction in which the strands flow. In dark areas, don’t be afraid to press hard (I used a 6B to 8B for these areas). To bring out highlights, flatten your kneaded eraser and swipe it in the desired direction.
What You Will Learn In This Guide
So, if you want to draw a loose curl, create the lines in an angle that’s more pointing down. When you’re happy with how it’s looking, merge all the layers except the one we called "Wavy Road", where you have the sketch. Now, let’s draw another wavy line next to the first one we drew to create your wavy road.
Make the hair chunks thicker at the roots and then thinner at the ends. You'll get everything you need to draw realistic butterflies in Procreate. In this tutorial, you'll get 3 simple ways to draw braids using Procreate. I'm using the " medium" brush from the hair brushes for every hairstyle. Just a quick note, if you want your hair to be curlier or to have a tighter curl, just make these shapes closer together. Continue to do this all through the guidelines you created before.
How to Draw Natural Looking Hair Step by Step
Then Shade all the curls according to the direction of the light. Hairlines, as with any hair type, can vary from person to person. For example, you might observe a squarish shape or a round one.
How To Draw Curly Hair On A Boy (Side Profile Guide)
Be sure to draw in the direction in which the curls are coming in and going out. This simple drawing exercise is an excellent method for improving a more intuitive grasp of how to create hair. Make a few circles that get progressively smaller from the largest to the smallest.
Straight hair is a lot easier to master as it consists of simple, flowing lines, whereas curly hair is more three-dimensional due to the bouncy, cylindrical curls. Curly hair drawings can be harder to get right, so we’ve created a guide to help you draw the curls of your dreams. In order to draw curly hair, first, you need to look at the shape of the head and draw a basic shape line, then a definite shape of hair by looking at the reference photo. After that, define guidelines for each curl as you start to achieve basic curly structure. Focus on each curl, and give its particular definition such as light, dark or thick and render it with the help of these tools. The examples in this tutorial can give you a good basic idea of how to draw some common hair types.
While all Type 4s tend to have a lot of volume, I've personally found 4As to often be a little more "bottom heavy" towards the shoulders, as the hair gets longer. Generally speaking, these curls are more likely to have a visible curl pattern—you might see pretty, S-shaped curls in the hair, for example. Keep in mind, however, that these curls are still going to be tight, voluminous curls. For reference, Type 1 refers to straight hair, Type 2 to wavy, Type 3 to curly, and Type 4 to coily. Notice how, as you move across the scale, there is an increase in volume and density.
Again, I've blocked out simple, primary contours, but this time, notice how the volume is a little "higher" on the head. Parting the hair can also affect its appearance, weight, and volume. Note how the curls tend to "clump", and there is an overall fluffy, soft appearance to the hair (cute, right?). Again, please note that no two people are exactly the same, and neither is their hair!


No comments:
Post a Comment